
What's inside the 5-phase walkthrough:

Phase 1: Overview & Setup Stats dashboard mockup + 6 feature cards (review link, platform sync, widgets, embed, automation, monitoring)
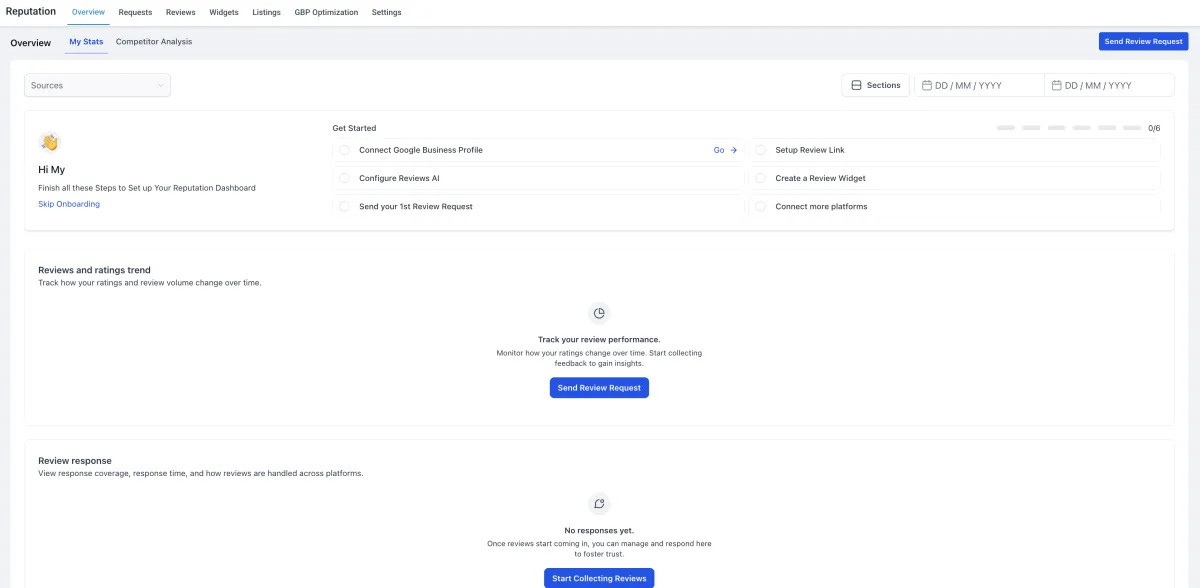
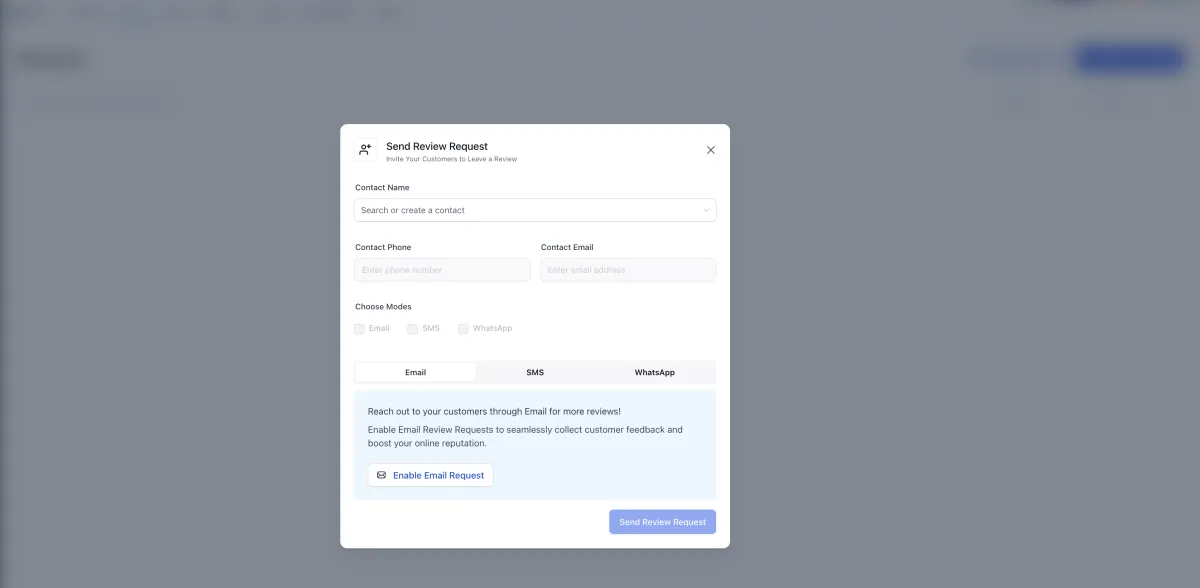
Phase 2 — Review Request Link Interactive star-rating mockup showing exactly what the customer sees → 6 steps and writing it in an automation
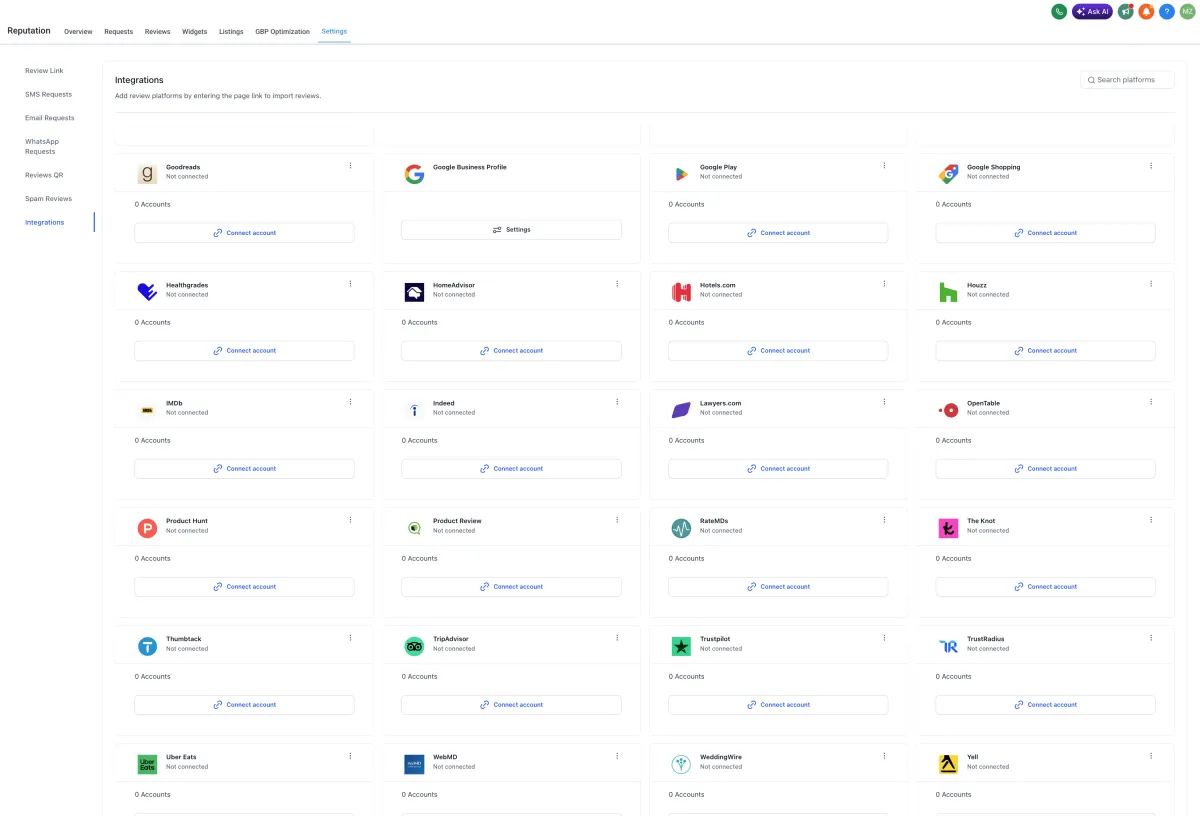
Connect your Google Business Profile and Facebook page so that reviews posted on those platforms automatically appear in your dashboard.
Add a Title Here

This is a Paragraph Font
Add a Title Here

This is a Paragraph Font
Add a Title Here

This is a Paragraph Font
AIBS — Reputation Management Walkthrough
AIBS Learning & Development — Subscriber Walkthrough

Reputation
Management Setup

A complete step-by-step guide to configuring your review request link, connecting your social platforms, setting up widgets, and embedding your reviews on your website or funnel.

1Overview & setup
2Review request link
3Connect platforms
4Widget setup
5Embed on site / funnel

What is reputation management?

Your reputation management hub lets you collect, display, and respond to customer reviews — all in one place. The system connects to Google, Facebook, and other platforms so every new review appears in your dashboard automatically.

4.8★
Average rating
247
Total reviews
93%
Positive
3
Platforms
What you will set up in this walkthrough
🔗
Review request link
A shareable link that sends customers directly to your preferred review platform with a single click.
🔗
Platform integrations
Connect Google Business, Facebook, and other platforms so new reviews auto-sync to your dashboard.
📷
Review widgets
Display-ready review carousels and badges that update automatically when new reviews come in.
📄
Website embed
Copy-paste code snippets to embed your live review widget on any website page or funnel step.
Automation triggers
Set automated review request emails and SMS messages that fire after a job, purchase, or appointment.
📢
Respond & monitor
Reply to reviews directly from your dashboard and get instant alerts when new reviews come in.
Where to find it: In your left sidebar, click Reputation (or look for the star icon). This opens your reputation dashboard where all reviews, widgets, and settings live.

Setting up your review request link

Your review request link — sometimes called a "magic link" or direct review link — sends customers straight to the review form on Google, Facebook, or your custom page without any extra steps.

How the review request page looks to your customer
🔒https://review.yourbusiness.com
Your Business Name
How was your experience? We'd love to hear from you.
🔍 Google
👤 Facebook
⭐ Trustpilot
How to configure your review request link
1
Go to Reputation → Settings
From the left sidebar, click Reputation. Then click the Settings tab at the top of the reputation dashboard. This is where your review request link and routing rules live.
2
Find the "Send Review Request" section
Inside settings, scroll to the section labeled Send Review Request or Review Link. Here you'll see your unique review link URL — this is the link you share with customers via email, SMS, or QR code.
Your link looks like: https://reviews.yourdomain.com/review?loc=XXXX
3
Set your primary review platform
Choose which platform (Google, Facebook, etc.) your link points to by default. You can also enable a pre-screen: customers who select 4–5 stars get redirected to Google, while 1–3 star feedback goes to a private form only you see.
4
Customize the review page branding
Upload your business logo, update your business name, add a custom headline (e.g. "How did we do?"), and set your brand colors. This page is what customers see when they click your link.
5
Copy and share your review link
Once configured, copy your link from the dashboard. You can:

• Paste it into an email or SMS automation
• Generate a QR code for receipts, business cards, or signage
• Add it as a button on your website or funnel thank-you page
Best practice: Add this link to every post-purchase or post-appointment automation. The faster you ask, the higher the response rate.
6
Set up automated review request sequences
Go to Automation and create a workflow triggered by a tag, pipeline stage, or form submission. Add a Send Review Request action step and select your template. The system sends the email or SMS automatically — no manual follow-up needed.
If your rating is below 4 stars, customers are shown a private feedback form instead of being redirected to Google. This lets you fix issues before they become public reviews. You can configure this threshold in Reputation → Settings → Review Funnel.

Connect your review platforms

Connect your Google Business Profile and Facebook page so that reviews posted on those platforms automatically appear in your dashboard. You can then reply, monitor, and display them — all without leaving the app.

Click a platform to connect it
🌎
Google
Connected
👤
Facebook
Not connected
Trustpilot
Not connected
😃
Yelp
Not connected
How to connect each platform
Google
Facebook
Other platforms
1
Go to Reputation → Settings → Integrations
In your reputation dashboard, click the Settings tab, then scroll to the Integrations section. Click Connect Google.
2
Sign in with your Google Business account
A pop-up will ask you to sign in with the Google account that manages your Google Business Profile. Use the account that owns the listing — not just any Gmail.
3
Select your business location
If your account manages multiple locations, you'll be asked to select which location to connect. Pick the correct one and click Allow.
No Google Business Profile yet? Go to business.google.com to claim and verify your listing first. This is required before connecting.
4
Reviews begin syncing automatically
Once connected, all existing and new Google reviews will pull into your reputation dashboard. You can reply directly from the dashboard — responses appear live on your Google listing.

Setting up your review widgets

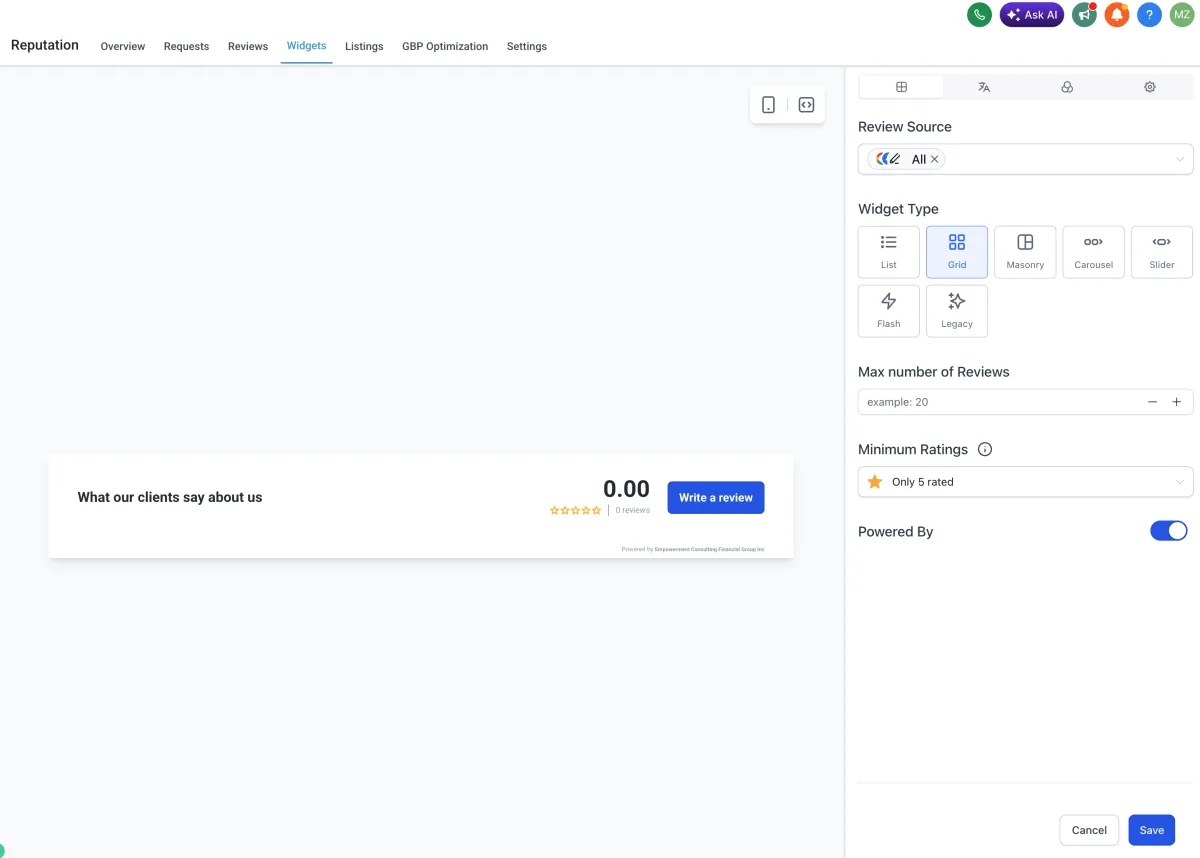
Widgets are embeddable display blocks that pull your live reviews and show them beautifully on your website or funnel. They update automatically as new reviews come in — no manual work required.

Widget preview (live example)
Sarah M.
Absolutely outstanding service. The team went above and beyond!
James K.
Quick, professional, and exactly what I needed. Highly recommend.
Lisa T.
Great communication and fast turnaround. Will use again for sure.
David R.
The onboarding was smooth and the results speak for themselves.
Carousel widget
Rating badge
Review list
Auto-update: All widgets pull from your live review feed. When a new review comes in on Google or Facebook, it automatically appears in your widget — no manual update needed.

Embed reviews on your website or funnel

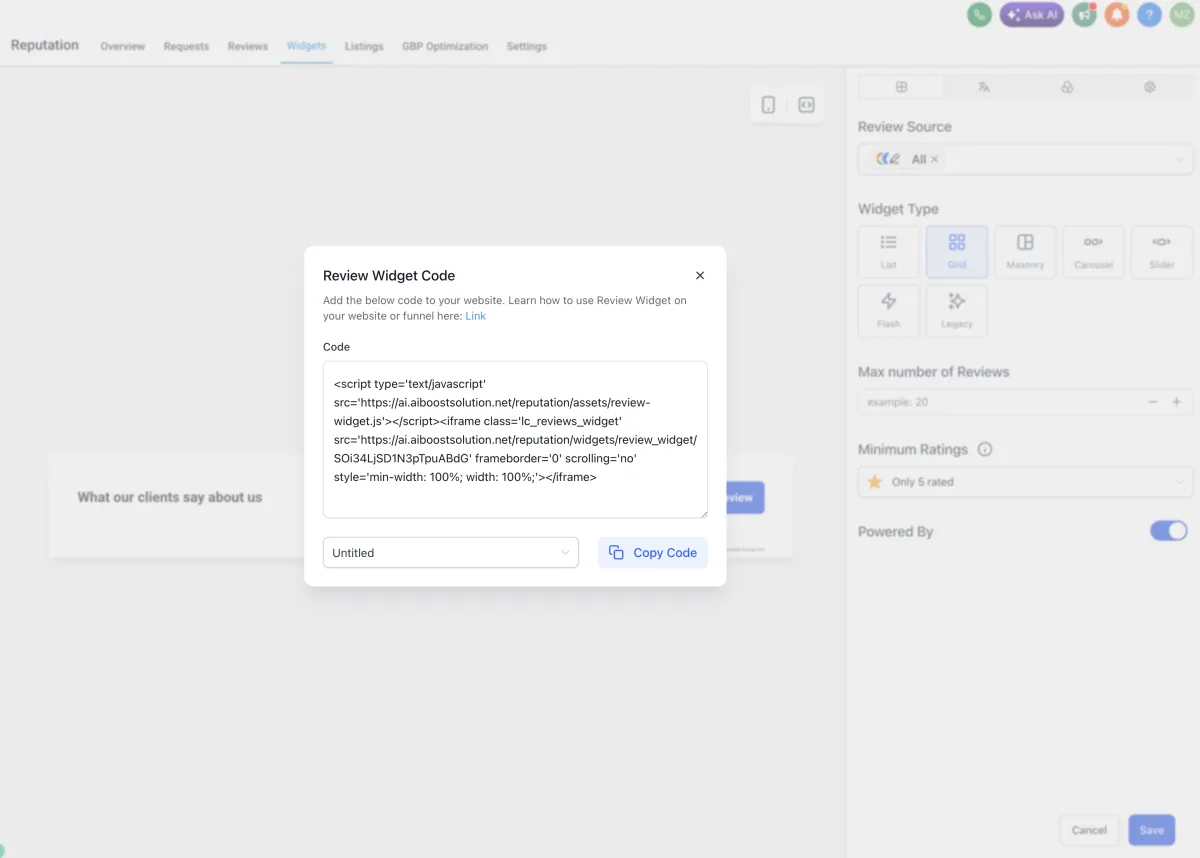
Once your widget is created, you get a code snippet. Paste it into any page builder, website, or funnel step. Your reviews will appear live and update automatically.

Embed in a funnel
Embed on a website
Use the Custom Code element inside your page builder. This is the correct element for pasting HTML and JavaScript — it renders exactly as configured when the page is published.
Step-by-step: embed in a funnel page
1
Copy your widget embed code
Go to Reputation → Widgets → your widget → click Get Code. You'll see two options: JavaScript snippet or iFrame. For funnel pages, use the JavaScript snippet — it renders better and respects your page styling.
2
Open your funnel page in the builder
Navigate to your funnel, click the step (page) where you want reviews to appear, and click Edit Page to open the builder.
3
Add a Custom Code element
In the left panel, find the Custom Code or HTML element. Drag it onto your canvas in the section where you want your reviews to display (e.g. a dedicated "What our clients say" section).
4
Paste your widget code
Click the Custom Code element to open its editor. Paste your full widget snippet into the code field. Click Save or Apply inside the code editor, then Save the page.
Tip: Preview the page in a browser tab after saving to confirm the widget renders correctly. It may not fully render inside the builder preview — always check the published or preview URL.
5
Publish the page
Back in your funnel dashboard, make sure the step is set to Published. Visit your live funnel URL and scroll to your reviews section to confirm everything is displaying correctly.
Example widget embed code
<!-- AIBS Reputation Widget — paste inside Custom Code element --> <div id="aibs-reviews-widget" ></div> <script src="https://widgets.yourplatform.com/reviews.js" data-widget-id="YOUR_WIDGET_ID" data-theme="dark" data-min-rating="4" data-count="6" async ></script>
Replace YOUR_WIDGET_ID with the actual ID from your widget settings page. The ID is shown next to your widget name in Reputation → Widgets.
Final setup checklist
Reputation section found in left sidebar
Review request link configured and copied
Google Business Profile connected
Facebook page connected (if applicable)
Review request automation created
Review widget created and configured
Widget embed code pasted into funnel or website
Live page tested and reviews displaying correctly
🎉
You're all set! Your reputation management system is live. Reviews will now sync automatically, your request link will collect new reviews on autopilot, and your widget will display them on your site and funnels in real time.
Image

Innovation

Fresh, creative solutions.

Image

Integrity

Honesty and transparency.

Excellence

Excellence

Top-notch services.

CUSTOMER CARE

LEGAL

Copyright 2026 AI BOOST SOLUTION All Rights Reserved.